How to Vfx Graph
This page contains set of useful hints, technical details and common use cases for Unity Visual Effect Graph.
Useful links
- E-book: Creating advanced visual effects in Unity
- Visual Effect Graph Documentation
- Unity VFX Graph Forum
- VFX Graph Roadmap
- SDF Package
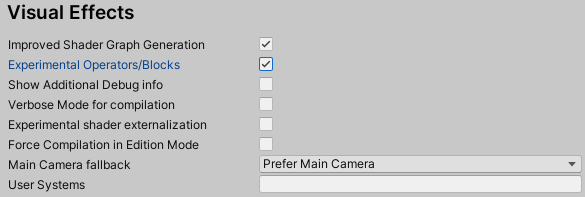
How to enable experimental blocks
Some nodes and features of vfx graph are hidden by default. If you can’t find some nodes that should be available in your Unity editor you need to enable them in preferences.
Navigate to Edit > Preferences > Visual Effects and turn on “Experimental Operators/Blocks”.
Context and block inspector
You can access all available properties of context and operator/block nodes by selecteing them in the graph window. You will find them in standard Inspector window.
How to pass particle data to shader
You may want to customize rendering of particles with custom shader that renders particles based on their data.
To do that, expose the needed shader properties - they will appear in the output context. Then get the particle data with the Get Attribute operator node (location must be set to current), and connect to exposed property.
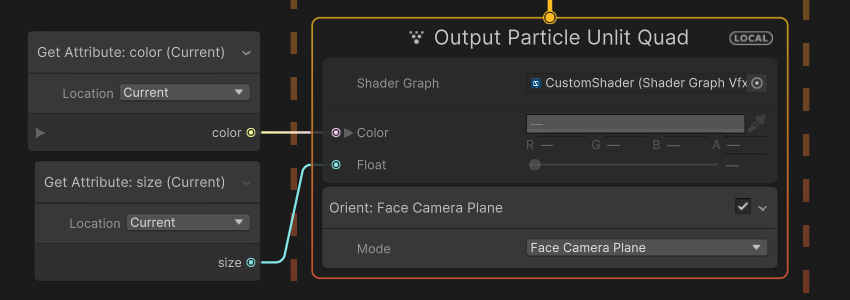
Particle color and size pased to the shader.
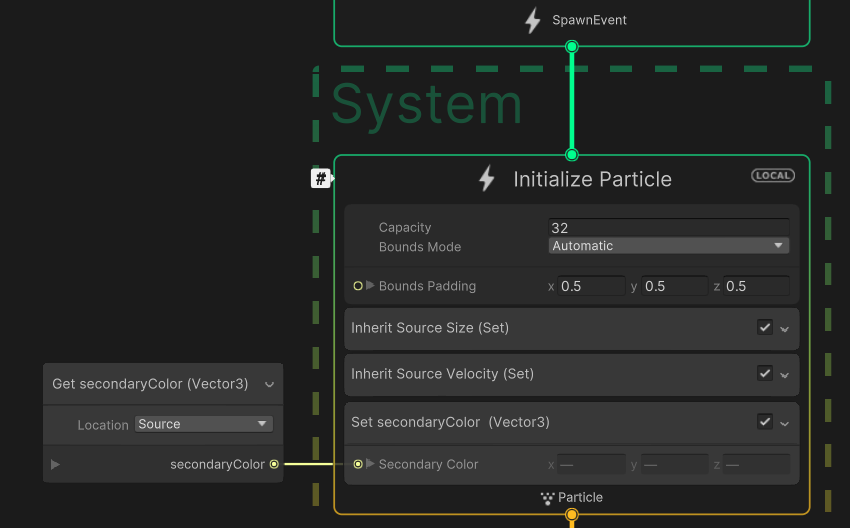
How to use custom attributes
Using nodes Get CustomAttribute and Set CustomAttribute allows to use custom particle attributes.
You can set name and type of attribute in the inspector.
It is important to set matching types of attribute in both getter and setter.
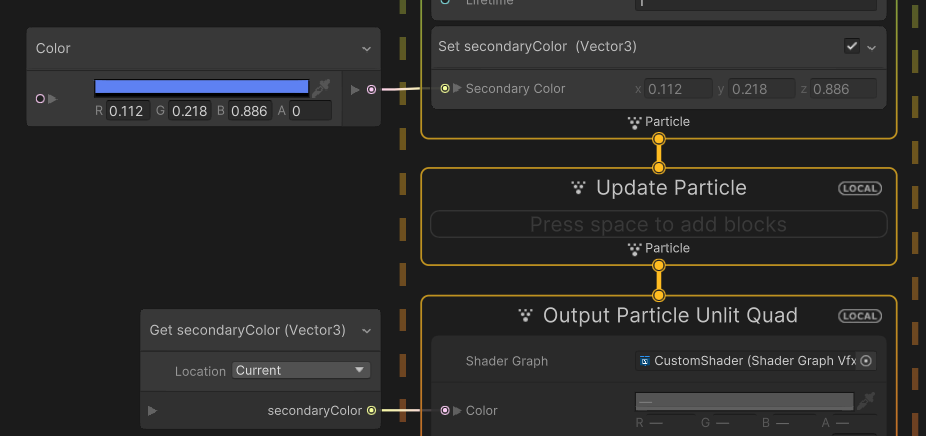
Custom attribute secondaryColor of type Vector3.
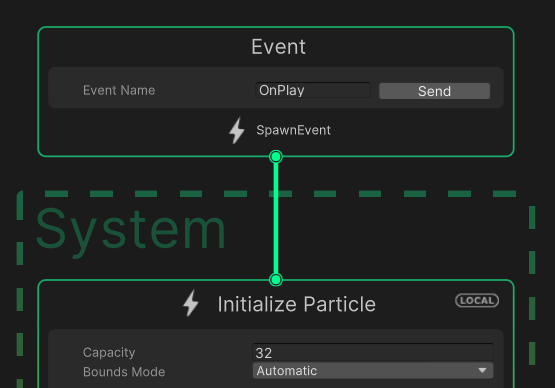
How to send event with attributes
You can initialize particles with data sent via event using method SendEvent(eventName, eventAttribute).
To pass the data you need to create instance of VFXEventAttribute, fill it with data you want and pass with the event. Following script sends size, velocity, and custom attrribute secondaryColor to visual effect instance.
using UnityEngine;
using UnityEngine.VFX;

public class SendEventExample : MonoBehaviour
{
    public VisualEffect vfx;
    public Color secondaryColor;
    public Vector3 velocity;
    private VFXEventAttribute eventAttribute;

    private void Start()
    {
        // Create vfx event attribute object
        // There is no need to recreate this object every frame
        eventAttribute = vfx.CreateVFXEventAttribute();
    }

    // Call this method to the send event
    private void PlayVFX()
    {
        // Set event data
        eventAttribute.SetFloat("size", Random.Range(0f, 1f));
        eventAttribute.SetVector3("velocity", velocity);
        // Custom attribute: secondaryColor
        eventAttribute.SetVector3("secondaryColor", new Vector3(secondaryColor.r, secondaryColor.g, secondaryColor.b));

        // Data is copied from eventAttribute, so this object can be used again
        vfx.SendEvent("OnPlay", eventAttribute);
    }
}
You need to capture the data inside the graph using Inherit attribute block. You can inherit event data only inside Initialize context.
In case of custom attributes there is no dedicated Inherit block, instead use Get CustomAttribute node with location set to “source”.
Data inheritance is essentially getting the attribute from source location.
How to use Direct Link feature
Calling SendEvent() on systems with spawn context is not cumulative - in case the same event is triggered multiple times per frame (for single instance) it overrides previous one and only the last one counts.
Direct link gives better control over spawn events and allows to bypass event limitation per frame.
To use this feature you need to connect Event context directly to Initialize particle context. By default it will spawn single particle, but you can specify number of generated particles in the script via VFXEventAttribute by setting spawnCount attribute.
// Important: Use SetFloat to set spawnCount
eventAttribute.SetFloat("spawnCount", 2f);
vfx.SendEvent("OnPlay", eventAttribute);
Additional resources: new-feature-direct-link
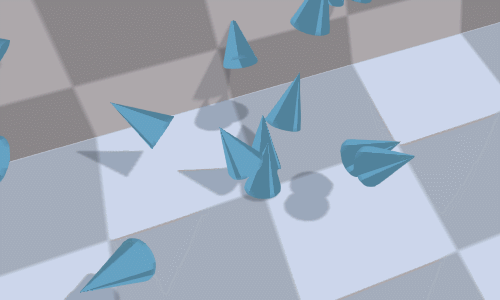
How to spawn or move particles along the line/shape
Below you can find two simple examples of spawning particles on line and moving them along the line.
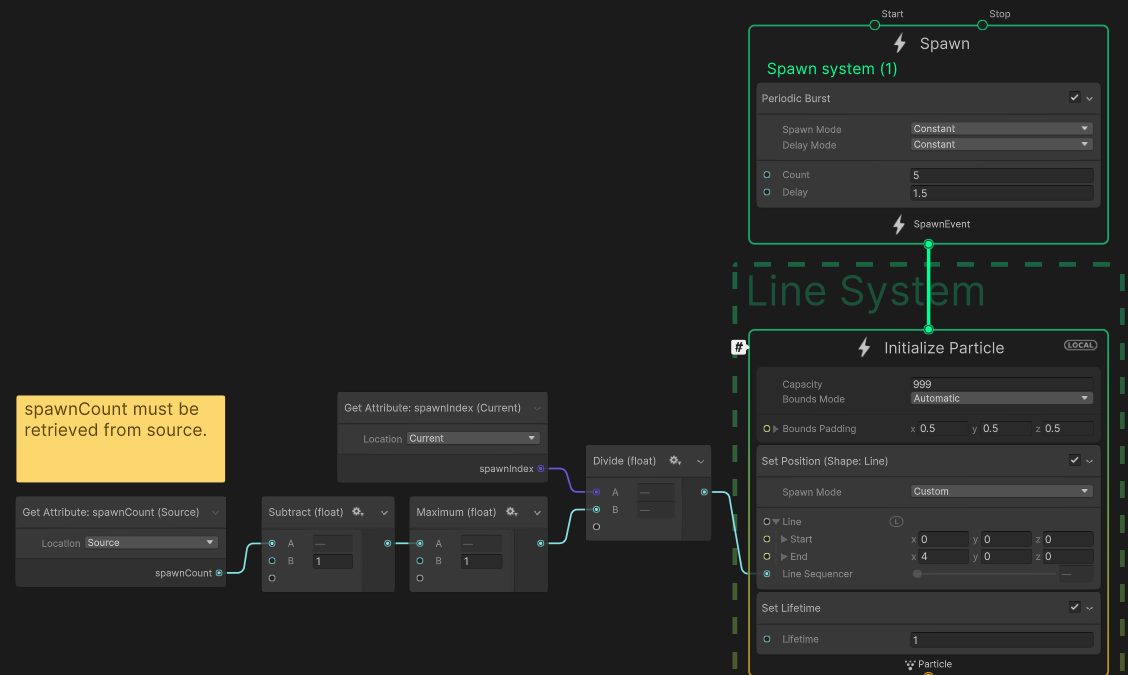
Particles evenly distributed between two points.
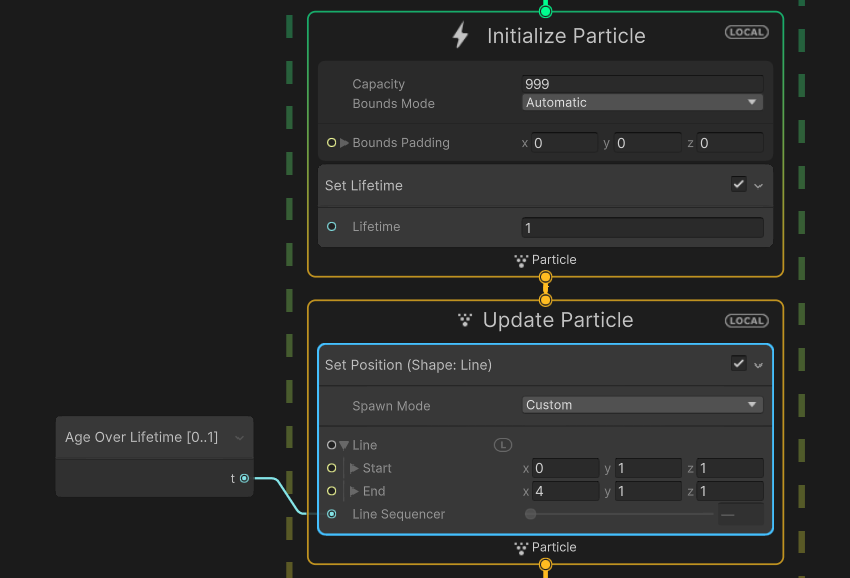
Particles moving along the line.
There are other various useful nodes to spawn particles:
- Line (block)
- Circle (block)
- Sphere (block)
- Torus (block)
- Cone (block)
- Sample Bezier (operator)
- Sequential 3D (block, operator)
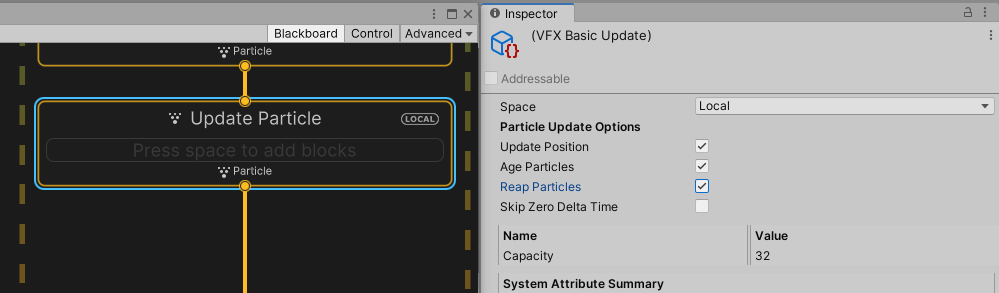
Update context vs Output context
These two contexts may look similar, but adding blocks to them can produce completely different results.
Update context is executed as compute shader and operates directly on particle data, meanwhile Output context is part of vertex shader and any changes to particle data are discarded.
It means that Output context changes last only until the end of frame, but because modified data is not written back to memory this operation might be cheaper in case of simple particles, but more costful when rendering mesh particles with higher vertex count. Another difference is that Update context can have more than one Output context connected and it might be worth to calculate something once instead of repeating the same operation twice or more. Changing position attribute in the Output Context may mess up particle sorting and particle strip Orientation.1
How to sample graphics buffer
Graphics buffer is one of the most useful tools, it allows to initialize particles with concrete data or update them in specific way. You must allocate memory before graphics buffer can be used, and after that its not possible to change its size. If you had to change the size you would need to dispose the old buffer and allocate new one, however allocation is not free operation, so you should avoid this when possible. Following example script takes the list of points and sends them through graphics buffer to visual effect:
using UnityEngine;
using UnityEngine.VFX;
using UnityEngine.VFX.Utility;
using System.Collections.Generic;

public class SetGraphicBuffer : MonoBehaviour
{
    private const int BufferStride = 12; // 12 Bytes for a Vector3 (4,4,4)

    [SerializeField] private int bufferInitialCapacity = 8;
    [SerializeField] private VisualEffect visualEffect;
    // Special helper class
    [SerializeField] private ExposedProperty bufferProperty = "SpawnPoints";
    [SerializeField] private ExposedProperty bufferCountProperty = "SpawnPointsCount";
    public List<Vector3> spawnPoints = new List<Vector3>();
    private GraphicsBuffer graphicsBuffer;

    void Awake()
    {
        // Initial allocation of graphics buffer
        EnsureBufferCapacity(ref graphicsBuffer, bufferInitialCapacity, BufferStride, visualEffect, bufferProperty);
    }

    void LateUpdate()
    {
        // Set Buffer data, but before that ensure there is enough capacity
        EnsureBufferCapacity(ref graphicsBuffer, spawnPoints.Count, BufferStride, visualEffect, bufferProperty);
        graphicsBuffer.SetData(spawnPoints);
        // Update current number of elements
        visualEffect.SetInt(bufferCountProperty, spawnPoints.Count);
    }

    void OnDestroy()
    {
        ReleaseBuffer(ref graphicsBuffer);
    }

    private void EnsureBufferCapacity(ref GraphicsBuffer buffer, int capacity, int stride, VisualEffect vfx, int vfxBufferProperty)
    {
        // Reallocate new buffer only when buffer is null or capacity is not sufficient
        if (buffer == null || buffer.count < capacity)
        {
            // Buffer memory must be released
            buffer?.Release();
            // Vfx Graph uses structured buffer
            buffer = new GraphicsBuffer(GraphicsBuffer.Target.Structured, capacity, stride);
            // Update buffer referenece
            vfx.SetGraphicsBuffer(vfxBufferProperty, buffer);
        }
    }

    private void ReleaseBuffer(ref GraphicsBuffer buffer)
    {
        // Buffer memory must be released
        buffer?.Release();
        buffer = null;
    }
}
The important thing is Buffer stride - it’s size (in bytes) of one element in the buffer. In this example we pass buffer of Vector3, so we need 12 bytes, 4 for each component.
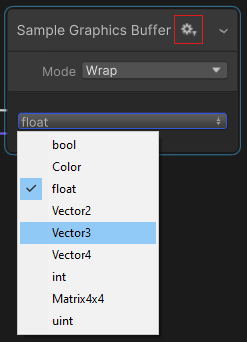
Inside the graph you need to select matching type of data used by the buffer. You can do it by clicking the small cog icon in the right top corner of the SampleBuffer node.
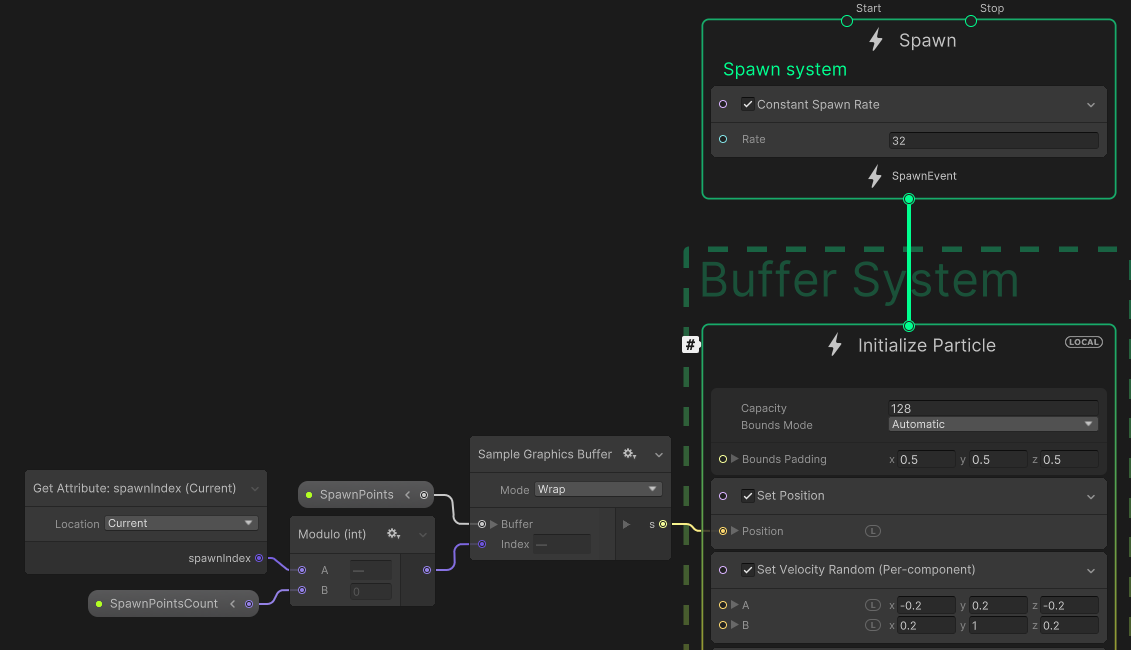
Following graph samples the buffer using spawnIndex and spawns particles between points provided by buffer. Because we do not shrink the buffer length, we must wrap index by number of current elements (index % count) in case we removed any spawn point.
If you want to use custom struct as buffer elements you can mark it with attribute [VFXType(VFXTypeAttribute.Usage.GraphicsBuffer)] and get stride size with System.Runtime.InteropServices.Marshal.SizeOf(typeof(YourStruct)); - more information here.
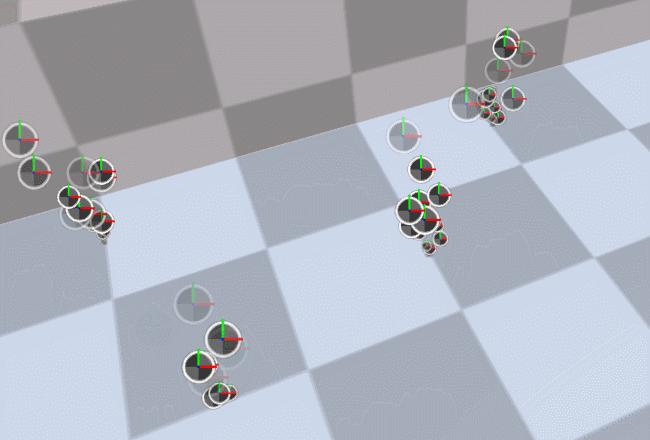
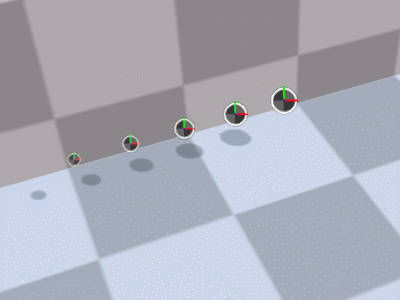
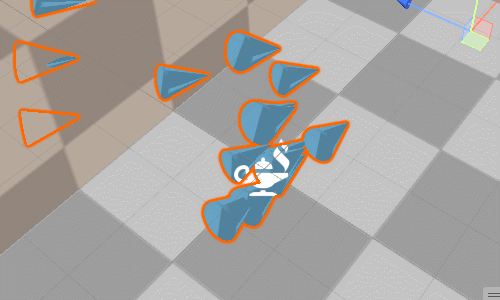
Adding and removing spawn points
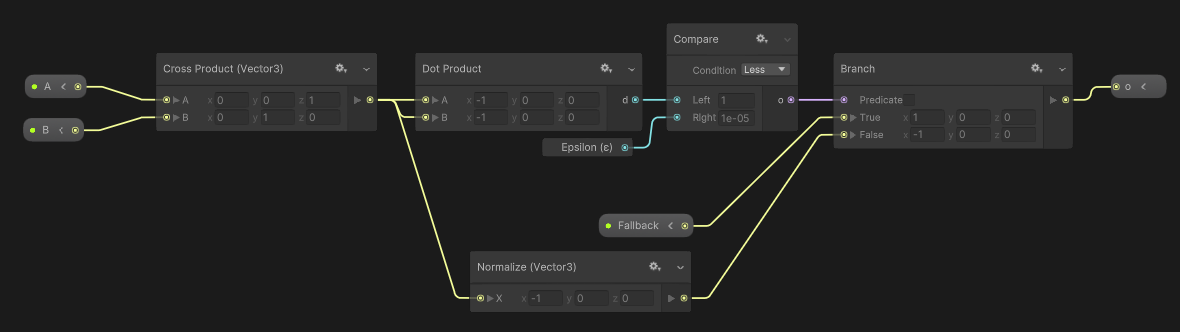
How to rotate particle towards position or direction
Generally Orient block is enough to rotate particles towards camera, direction/position or along velocity, however particles will be ‘biased’ towards camera and sometimes this is not desired behaviour - especially for mesh particles. To fix this you need to specify new axes for rendering, you need two directions: the forward vector and “up” (or left) direction. The third vector will be calculated with cross product. The following graph rotates particles along velocity, or towards target direction (when result of substraction is connected to the safe normalize instead).

Along velocity
Towards target position
However, there is one problem with the graph above, if direction is collinear to the second (up) vector the cross product will fail to find the axis and we end up with zero - in such a case particles will disappear.
We need to add safe checks that are present in other orient modes. The source code of Orient: Along Velocity looks like this:
axisY = normalize(velocity);
axisZ = position - GetViewVFXPosition();
axisX = VFXSafeNormalizedCross(axisY, axisZ, float3(1,0,0));
axisZ = cross(axisX,axisY);
We need to recreate VFXSafeNormalizedCross() and replace our current cross.
You can download the subgraph here
.
float3 VFXSafeNormalizedCross(float3 v1, float3 v2, float3 fallback)
{
    float3 outVec = cross(v1, v2);
    outVec = dot(outVec, outVec) < VFX_EPSILON ? fallback : normalize(outVec);
    return outVec;
}
Additional resources: particles-orient-to-camera, rotate-particles-towards-direction
How to scale object and get object transform
When system simulation space is set to World particles ignore parent object scale. If you want particles to be still affected by object scale, you can scale them with LocalToWorld node.
This node returns matrix that can be used to transform positions, directions and vectors.

Particles simulated in world space, but initialized with object scale.
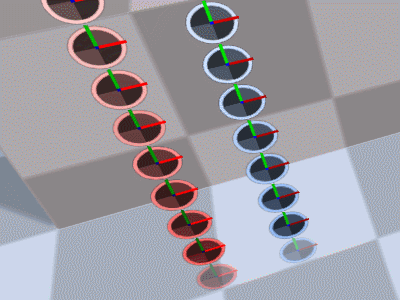
Changing scale of game object with two systems, first simulated in world space (red) and other local space (blue).
Additional resources: access-world-scale-of-visual-effects-game-object
How to create custom spawning behavior
It is possible to create custom spawn system without using any C# scripts with use of Spawn State node. You can find example of custom spawn over distance in the following forum thread:
https://forum.unity.com/threads/spawn-over-distance-is-causing-gc-spikes.1104196/#post-8442167
How to spawn spawn over distance with interpolation (oldPosition)
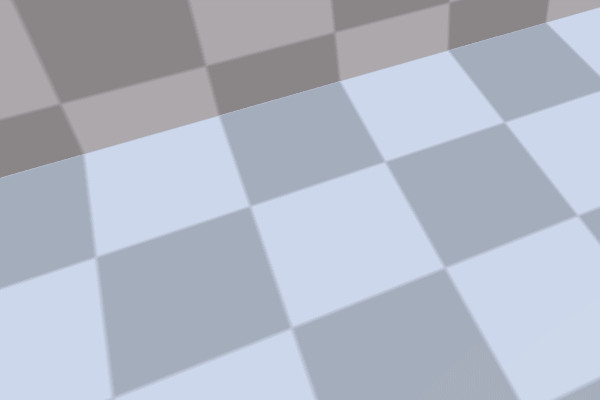
When particles are spawned over distance they are generated every tick of system, in result particles spawn in groups and create empty gaps.You can enable “Clamp To One” option to spawn max one particle in one place, however this does not fix the problem with gaps.


Default behaviour
To fix this you can use oldPosition to interpolate spawned particles in better way. If you use source old and new position you can distribute them evenly like in the graph below or use Random Number to randomize them between these positions.
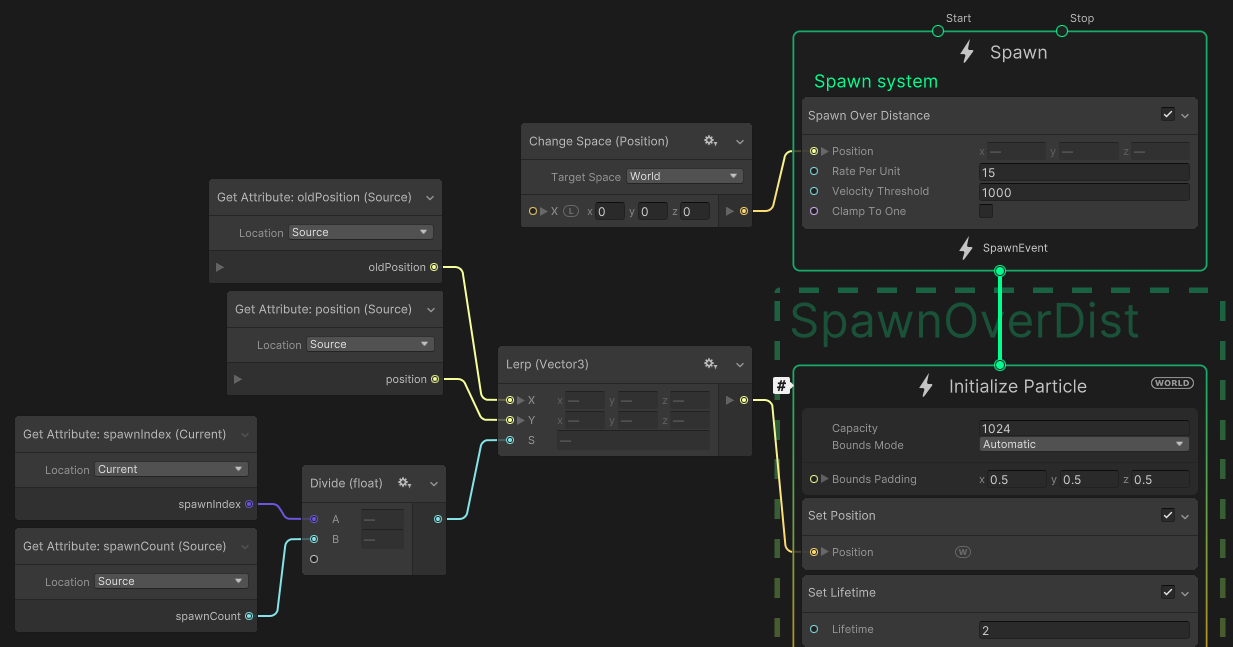
Improved behaviour
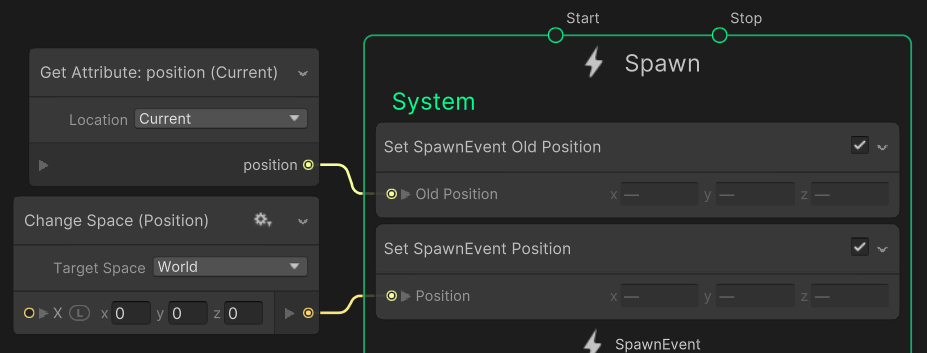
How to use oldPosition and set it in source location
By default the oldPosition attribute is not set, the only exception is SpawnOverDistance. If you want to be able to access last position in main system or in particles spawned with GPU event you must set it manually. You can do it inside the graph inside the spawn context, or via the script.
Additional resources: smooth-emit-over-time-distance-using-velocity-only
Mesh sampling and point cache
You can read great post about mesh sampling here: https://forum.unity.com/threads/uniform-distribution-with-skinned-mesh-sampling.1188571
Additional resources: emit-particles-from-animated-rig-model
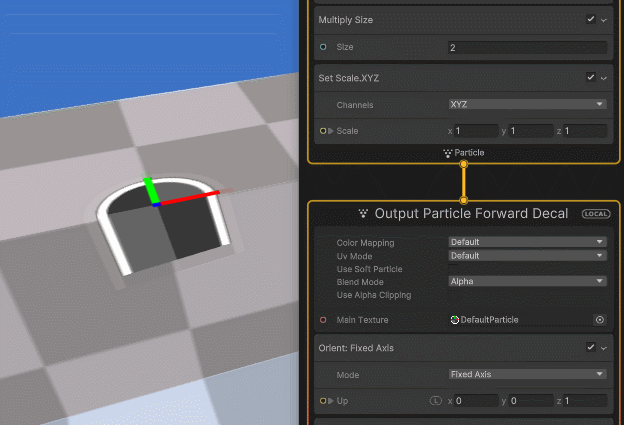
How to use particle decals
Output Particle Decal context is used to spawn decal particles. Important detail is that particle size and particle scale defines the decal box used to cast decals.
For example if you want to spawn decal on the ground you can orient particles with Orient: Fixed Axis with Z as up. Now the depth/height of the box is controlled by Z component of particle scale.
Currently URP VFX decals do not support layers.
How to bake SDF (Signed Distance Field)
VFX Graph has integrated signed distance field bake tool that allows to generate SDF for meshes or prefabs (Window > Visual Effects > Utilities > SDF Bake Tool). However, there is an API that allows you to create your own baking tool and update the SDF at runtime. There is example of baking SDF for skinned mesh in the docs.
You can also bake multiple meshes into single SDF, however MeshToSDFBaker class uses CombineMeshes to merge them, and it requires meshes to be readable when used in runtime.
Example script below finds all mesh renderers and bakes part of the scene into SDF.
using System.Collections.Generic;
using UnityEngine;
using UnityEngine.VFX;
using UnityEngine.VFX.SDF;
using UnityEngine.VFX.Utility;

[ExecuteAlways]
public class SDFSceneBaker : MonoBehaviour
{
    public LayerMask collectLayers = -1;
    public bool bakeOnAwake = false;
    [Header("Box")]
    public Vector3 center;
    public Vector3 size = Vector3.one;
    public int maxResolution = 32;
    [Header("SDF Baker")]
    [Range(1, 16)]
    public int signPassesCount = 1;
    [Range(0f, 1f)]
    public float threshold = 0.5f;
    [Range(-1f, 1f)]
    public float offset = 0f;
    [Header("Debug")]
    [SerializeField] private VisualEffect debugVFX;
    [SerializeField] private ExposedProperty sdfTextureProperty = "sdf";
    [SerializeField] private ExposedProperty sdfPositionProperty = "sdfPosition";
    [SerializeField] private ExposedProperty sdfScaleProperty = "sdfScale";

    private readonly List<Mesh> meshes = new List<Mesh>();
    private readonly List<Matrix4x4> matrices = new List<Matrix4x4>();
    private MeshToSDFBaker sdfBaker;
    public Vector3 CenterWS => transform.TransformPoint(center);

    private void OnValidate()
    {
        size = new Vector3(Mathf.Max(0, size.x), Mathf.Max(0, size.y), Mathf.Max(0, size.z));
    }

    private void Start()
    {
        if (Application.isEditor || bakeOnAwake)
        {
            BakeSDF();
        }
    }

    private void OnDestroy()
    {
        sdfBaker?.Dispose();
        sdfBaker = null;
    }

    [ContextMenu("Bake SDF")]
    public void BakeSDF()
    {
        CollectMeshes(meshes, matrices);

        if (sdfBaker == null)
        {
            sdfBaker = new MeshToSDFBaker(size, CenterWS, maxResolution, meshes, matrices, signPassesCount, threshold, offset);
        }
        else
        {
            sdfBaker.Reinit(size, CenterWS, maxResolution, meshes, matrices, signPassesCount, threshold, offset);
        }
        sdfBaker.BakeSDF();

        if (debugVFX != null)
        {
            debugVFX.SetTexture(sdfTextureProperty, sdfBaker.SdfTexture);
            debugVFX.SetVector3(sdfScaleProperty, sdfBaker.GetActualBoxSize());
            debugVFX.SetVector3(sdfPositionProperty, CenterWS);
        }
    }

    private void CollectMeshes(List<Mesh> meshes, List<Matrix4x4> matrices)
    {
        // Find all mesh renderers on scene
        MeshRenderer[] meshRenderers = FindObjectsOfType<MeshRenderer>();

        // Prepare lists
        meshes.Clear();
        matrices.Clear();
        meshes.Capacity = Mathf.Max(meshes.Capacity, meshRenderers.Length);
        matrices.Capacity = Mathf.Max(matrices.Capacity, meshRenderers.Length);

        // Collect valid meshes matching the layer mask
        for (int i = 0; i < meshRenderers.Length; i++)
        {
            MeshRenderer meshRenderer = meshRenderers[i];
            if (collectLayers == (collectLayers | (1 << meshRenderer.gameObject.layer)) && meshRenderer.TryGetComponent(out MeshFilter meshFilter))
            {
                meshes.Add(meshFilter.sharedMesh);
                matrices.Add(meshRenderers[i].localToWorldMatrix);
            }
        }
    }

    private void OnDrawGizmosSelected()
    {
        // Baking box gizmo
        Gizmos.color = Color.yellow;
        Gizmos.DrawWireCube(CenterWS, size);
    }
}

#if UNITY_EDITOR
// Inspector bake button
[UnityEditor.CustomEditor(typeof(SDFSceneBaker))]
public class SDFSceneBakerEditor : UnityEditor.Editor
{
    public override void OnInspectorGUI()
    {
        DrawDefaultInspector();
        UnityEditor.EditorGUILayout.Space();
        if (GUILayout.Button("Bake SDF"))
        {
            (target as SDFSceneBaker).BakeSDF();
        }
    }
}
#endif
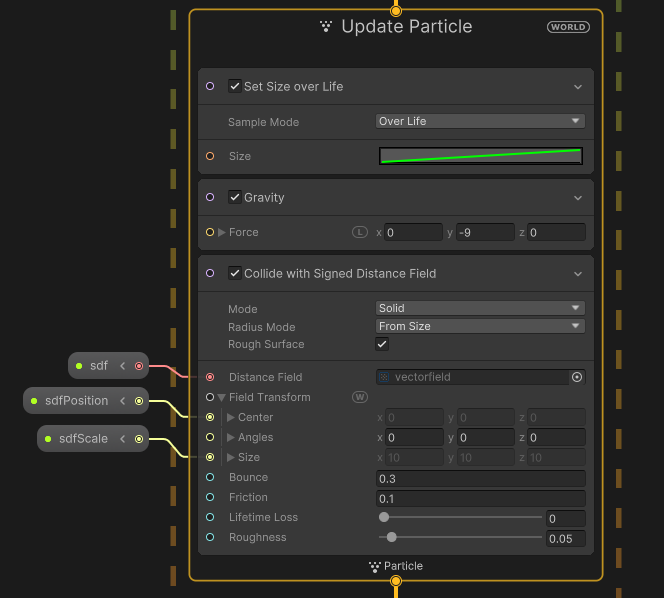
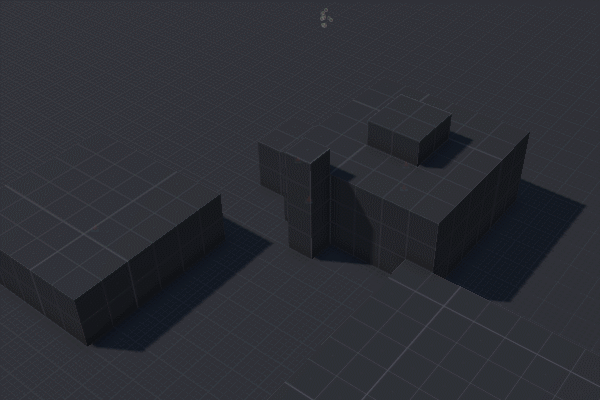
Debug graph has simple particle system with SDF collision block.
Additional resources: sdf-collision-is-leaking-particles, SDF Package
How to kill particle via blackboard “event”
// TODO
How to use GPU events
// TODO